On This Page: Technical Requirements ♦ Candidate Enrollment ♦ Account Creation or Confirmation ♦ Checkout Process ♦ Course Access
This guide provides requirements and instructions for enrolling in Biotility courses and exams. Enrollment is processed in partnership with UF Professional and Workforce Development (UF PWD).
This guide covers:
- Technical Requirements
- Candidate Enrollment
- Account Creation or Confirmation
- Checkout Process
- Course Access
Technical Requirements
To ensure a smooth and successful exam experience, candidates should carefully review and confirm they can meet the following requirements before beginning the enrollment process.
Identification Requirements
Candidates must create exam accounts in multiple systems. The name on each account must exactly match the photo ID. If names differ, the proctor cannot start the exam.
Use your full legal name, avoid nicknames, and check spelling and capitalization. Contact Biotility at biotilitycs@research.ufl.edu if your name includes special characters, such as hyphens or suffixes, or differs from your ID.
Acceptable ID Requirement: Valid, original government- or school-issued photo ID
On-Site Testing: Additional Requirements
The Site Coordinator is responsible for collaborating closely with their institution’s technical staff to ensure that all requirements outlined in this document are fully met. To prevent any access issues, Biotility strongly recommends that the Site Coordinator and technical staff conduct a thorough verification of candidate access to UF e-Learning (UFEL) from the computer lab testing room and/or personal computers at least one month prior to candidates accessing the online content.
Refer to the Technical Requirements for for On-site Testing.
Remote Testing: Additional Requirements
Administrative access is required for remote monitoring software. Use a personal computer with administrator privileges. For institution-managed devices, ask Information Technology personnel to contact ProctorU in advance and approve downloads, network ports, and allow list settings.
Refer to the Technical Requirements for for Remote Testing.
Remote Testing Station Requirements
- Desk or table only.
- Clear all items from on and under the desk.
- Only one computer monitor is allowed. Unplug others and restart.
- Dry-erase whiteboard and marker required; scratch paper prohibited.
Remote Testing Environment Requirements
- No writing on desk or walls. General artwork is allowed; scientific diagrams are prohibited.
- Room must be well-lit with daylight-quality lighting.
- No background music, TV, or people.
- Handheld mirror or front-facing phone camera is required for room scanning.
Candidate Enrollment
Enrollment in Biotility courses and exams on UFEL occurs through UF PWD in Destiny One.
Enroll at least 1 month before the preferred test date for technical setup and scheduling. Complete enrollment by 4 business days before the desired exam date.
-
Sign out of all other accounts. If more than one account is signed in, the system may pull the wrong name and attempt to create your record under a nickname or another person’s identity.
-
Sign in to your Google, Microsoft, or LinkedIn account. Use the account that shows your legal name — this is the account you will later use to create your UF External Identity.
- Use an account (Google, Microsoft, or LInkedIn) that may be accessed at your exam site.
- Ensure the account shows your legal name, spelled correctly.
- Select an account that can be used long-term. If it is a school account, you must update contact information with Biotility before graduation to continue access to earned credentials.
- Always use the same account for enrollment and sign in.
- Enroll only once per course.
-
Enroll based on the testing option of choice:
- Remote Testing: Enroll here, or navigate to the enrollment site from the Biotility website.
- Use the enrollment link provided by your Site Coordinator. Select the enrollment link. You are now on the Biotility Course Enrollment page

-
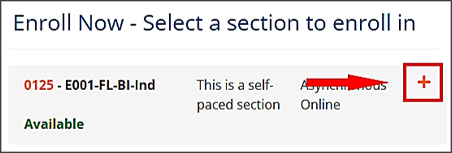
Select the orange plus ( + ) next to the course section.
-
Select Add to Cart.

-
You are now in the Cart View. Review the course details and any fees in your cart. This process follows one of three scenarios:
-
Scenario One: Free Courses - No fee appears in the cart. 1) Confirm the total is $0.00, and 2) Select Checkout.

-
Scenario Two: Fee-Based Courses with Full Discount - A fee appears in the cart. 1) Select Apply a Discount, 2) Enter the Coupon Code, 3) Confirm the total is $0.00, 4) Select Checkout.

-
Scenario Three: Fee-Based Courses with Partial or No Discount - Stop using this document and refer to the Enrollment Guide for Self-Pay Candidates for full instructions on how to navigate this scenario.
-
-
You are now on the UF External Identity Login Page. Select an external login option (Google, LinkedIn, or Microsoft).

-
On the Sign-in with Google page, enter your Google email address, and then select Next.

-
Enter your Google password, and then select Next.

-
Open the Gmail app on your phone. Select Yes on the prompt to verify your identity. If desired, select Don't ask again on this device to skip this step in the future.

-
On the Sign in to UF External Identity page, review the information that will be shared, specifically name, profile picture, and email address. Verify your name, then select Continue to allow access and proceed with enrollment.
CRITICAL STEP: Ensure the name shown on the screen matches your legal name and the Candidate ID you will use on exam day. If the name does NOT match, then: 1) Stop the Enrollment Process, 2) Update your name in Google, Microsoft, or LInkedIn OR sign out and use a different accoung with your correct legal name, and 3) Clear your browser cache.

-
You are now on the Search for an Existing Account page. This page checks if you already have a UF PWD account or need to create a new one. Enter the required information, then select Submit.

-
A verification code is sent your email. Enter the code in the Email Verification Code box. When the box turns green and shows Verified, select Submit again.

-
Now you are on the My Profile page. This page allows you to verify and add information. Use the scroll bar to view all four sections.
-
Section 1: Name and Email - Verify your first name, last name, and email address.

-
Section 2: Address and Telephone - Enter your address type, street address, city, state/province, country, postal code, telephone type, and phone number.


-
Section 3: Date of Birth - Enter your date of birth.

-
Section 4: Privacy - 1) Review your contact preferences, 2) Type your initials to confirm you have read and understood the University of Florida's Privacy Policies, 3) Select Continue Checkout.

-
-
Now you are on the Payment page. This page allows you to both verify and add information. Use the scroll bar to view all four sections.
-
Section 1: Profile Summary - Verify that your profile information is correct.

-
Section 2: Cart - Verify the total is $0.00.

-
Section 3: Questionnaire - Answer the three required questions. You may select Prefer Not to Say if you choose.

-
Section 4: Payment Policy Confirmation - Ready Biotility's payment policy for the course. 1) Select the checkbox to confirm that you have read and understood the policy. Because the total is $0.00, no payment is required. 2) Select Continue Checkout to finish.

-
-
Now you are on the Receipt page. This page is the final screen in the enrollment process. Seeing this page confirms that enrollment is complete.

-
A copy of the receipt and registration confirmation is sent to the email address on file. Candidates should verify that they receive two confirmation emails: UF Biotility Enrollment Notification and UF Biotility Receipt. Candiates may be asked to forward these emails to their Site Coordinator as proof of enrollment.

Course Access
To access courses you are enrolled in, follow the steps below:
- Navigate to the UF e-Learning Login page.
- Select External ID.
- Sign in with the social account you enrolled through.
- Once in UF e-Learning, select the appropriate course tile from your dashboard.
Last Updated: 09/18/2026